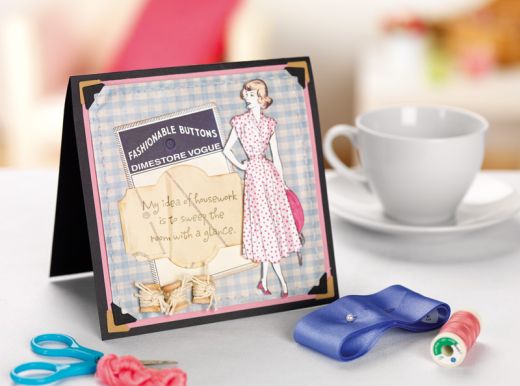
Make a fun card with a vintage twist – perfect for so many occasions!
What you need...
- Adhesive: 3L SCRAPBOOK ADHESIVES: 3D Foam Squares, Classic Photo Corners Black and Kraft, MyStik™ Permanent Strips
Paper : Patterned Blue Gingham from Dimestore Vintage Kit by Vintage Street Market; Black and pink cardstock from WorldWin Papers
Stamp: Inkadinkado Housework stamp # 94830MM
Die-cuts : Spellbinders S5-027 Labels Twenty-One; Spellbinders Grand Calibur machine
Ink: Clearsnap Black Pigment and Chestnut Roan Fluid Chalk Inks; Foam applicator
Scoring Tool: Scor-Pal Scoring Board; Piercing Bugs Rotary Tool
Spools: Darice Craftwood ½ “ x ?” spools
Other: String, sewing needle, pink thread
instructions
-
My Idea of Housework Card - 1 Cut black card to 6” x 12”, score at centre and fold in half to make 6” square blank. Trim pink card to 5.5” square and then blue gingham patterned paper 5¼” x 5¼”.
2 Using a Scor-Pal and Piercing Bug tool, make a line of holes ¼” in from the edges all around the blue gingham paper. With a sewing needle and thread, stitch all the way around. (Alternately, you may use a sewing machine)
3 Add Black Classic Photo Corners to the blue gingham paper, then stick to the pink panel using Clear Mounting Squares. Add Kraft Classic Photo Squares to the pink card, and adhere the whole piece to the black card blank with MyStik™ Permanent Strips.
4 Ink the edges of button card in brown, using a foam applicator. Stick to the centre front of the card, slightly askew, with Clear Mounting Squares.
5 Stamp the phrase onto sewing pattern paper with black ink. Align the die template for perfect placement then cut and emboss before inking the edges in brown. Adhere the finished piece over the button card.
6 Apply 3-D foam squares to the back of a Lady die-cut motif. Use the foam applicator to lightly colour her hair with brown ink, then adhere slightly overlapping the central button card and die-cut.
7 Cut two small wooden spools in half, as shown, adding 3-D foam squares behind the centres. Wrap three with twine and tie knots to the front. To complete, adhere to the card as shown.
View the full range of 3L adhesives at www.scrapbook-adhesives.com


