Make a spook-tacular impression with these four makes for Halloween
What you need...
- Card, green, purple, orange, black, grey, white
Blanks: square, 15cm, 9.5cm; 10cm x 15cm
Paper, patterned
Stamps, sentiments,Make a Monster, Batty for You, Party This Way
Punches, border, Arch Lattice; circle, scalloped,label, decorative, Martha Stewart
Round tab, oval, Swirl Flourish, EK Success
Die, Top Note, Sizzix
Big Shot Machine
Glitter, black
Ribbon, black
Ink-pads, purple, green, orange; Staz-On, black
Glue-pad
Pen, fine-liner, black
Aqua Painter
Sponge, small
Adhesives
instructions
-
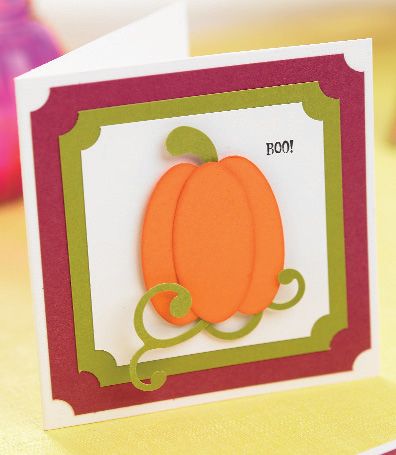
pumpkin card - 1 Punch three ovals out of orange card. Ink the edges using a small sponge. Layer to form a pumpkin. Cut two decorations using the Swirl Flourish punch and stick to the back of the pumpkin to form leaves and a stalk. Attach the finished motif to white card, 6.5cm square, using 3-D foam pads to create depth.
2 Clip the corners of the white card with a small circle punch. Layer onto green, 7.5cm square, and adorn the corners in the same way. Layer onto purple card, 9cm square, and again clip the corners. Stick onto a white blank, 9.5cm square, to finish. -
party card - 1 Stamp monsters onto white card, 7cm x 16.5cm, using black Staz-On ink. Colour with purple, green and orange inks and an Aqua Painter. Layer onto purple card, 7cm x 17cm. Make a blank by folding green card, 20cm x 21cm, in half. Cut striped paper, 9.5cm x 20.5cm, and green dotted paper, 5cm x 20.5cm. Stick the latter to the top of the former, as shown.
2 Attach a length of black ribbon over the join and fold the ends over the edge of the patterned papers. Glue to the green blank and stick the monster image centrally. Stamp ‘You’re Invited’ in black onto white, 1.5cm x 5cm, clip the bottom right corner using a circle punch. Layer onto green card, 2cm x 5.5cm, and adorn in the same way.
3 Fix onto the main monster layer. Stamp the ‘Party This Way’ arrow onto white card and cut out. Colour with orange and green inks using an Aqua Painter and stick to the card in bottom right-hand corner using 3-D foam pads.
-
monster birthday - 1 Using a Big Shot machine, cut the Top Note shape out of green card. Trim another out of grey card. You could cut these shapes by hand if you don’t have diecutting machine. Snip jaggedly along the top of the grey shape to create hair. Make a circle out of green card and slice in half. Ink the edges in green using a small sponge. Trim two white circles and two small black ones. Assemble to make eyes.
2 Create a nose out of green card using the Round Tab punch. Cut in half and ink the edges of one half. Stick in position, then glue down the eyes and lastly the hair. Create bolts out of grey card using the Round Tab punch. Cut in half and stick to back of green shape. Add a mouth and scars using a black fine-liner pen.
3 Cut orange patterned paper, 8cm x 13cm, and layer onto purple, 8.5cm x 13.5cm. Fix to a white blank, 10cm x 15cm. Stick on the monster face using 3-D foam pads. Create the sentiment using a computer and print onto white paper. Cut to 1cm x 8cm and stick on, as shown.
-
happy Halloween - 1 Stamp the spider, skull and cat images in orange, purple and green ink respectively onto white card. Cut out with a circle punch and layer onto scalloped rounds made from purple, green and orange card. Stick onto a strip of white card, 5cm x 13cm, using sticky 3-D foam pads and layer onto green card, 5.5cm x 13cm.
2 Stamp the spider web image randomly all over purple card, 5cm x 13cm, using the glue pad. Sprinkle on black glitter. Create a decorative edge using the Arch Lattice border punch along black card, 2.5cm x 13cm. Fix this behind the purple panel, so the edge shows at the top.
3 Cut patterned paper, 13cm square, and mount onto purple, 14cm square. Add a spider web strip at the bottom and the spider/skull/cat panel at the top. Stamp ‘Happy Halloween’ in purple onto white card and cut out using the Decorative Label punch. Adhere using sticky foam pads and assemble all to a white blank, 15cm square.


