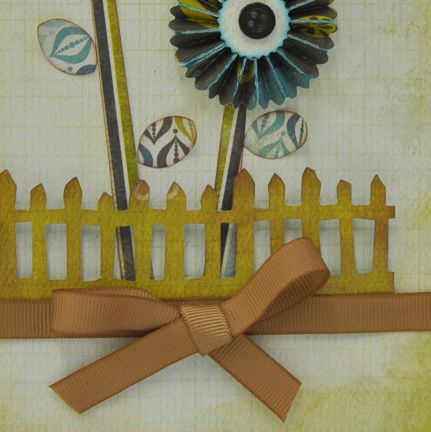
Create a petal card using our step-by-step guide
What you need...
- Vagabond™ Machine 656850
Sizzlits® Decorative Strip Die, Mini Paper Rosette’s by Tim Holtz®,657177
On the Edge™ Die, On the Fence by Tim Holtz®, 657030
Sizzlits® Flower Set #4, 656762
Brown Ribbon
2 x Small dark brown Buttons
Inks
Inspire me Paper, Mocha Brown
My Mind Eye Paper, ‘So Sophie’ – Living Proof, ‘Spontaneous Floral’, ‘Pleasant Stripe’, ‘Forever with you’ and ‘Sweet Chic’
Glue, adhesive foam pads, Double sided tape.
instructions
-
How to make - 1 Create a base card 11x19cm using Brown Card. cut a piece of the Graph style paper 10.5x18.5cm and glue to the centre of your card. Next cut two strips of the stripy paper at different lengths, these will be your flower stalks. Use the Sizzlit® Flower Set #4 flower die to cut three small leaves from patterned paper and ink the edges with brown ink.
2 Now take the Rosette Decorative strip and cut one of each size from floral patterned paper. To make the Rosette: first stick a large adhesive foam pad down onto a clean work surface, Fold the Rosette along the dotted lines and form into a circle. Holding both ends together, stick the Rosette down onto the foam pad. Next glue the two ends together using a glue gun or strong adhesive. Add a blob of glue in the centre and place the Rosette centre over the top. Add a button to finish.
3 Glue down the flower stalks about 3cm above the bottom of your card as shown. Curl the edges of the small leaves slightly and attach them to the card. Add the Rosettes at the tops of the stalks using the sticky foam pad.
4 Next cut out the fence shape using the On the Fence die. Ink the edges using brown ink and attach to the card using small adhesive foam pads. Add a piece of brown ribbon along the bottom of the fence using thin double sided tape. To finish the card print the message onto a small piece of the graph style paper, ink the edges with green ink and attach using foam pads.
Make sure you follow Stacey’s blog on Sizzix.co.uk – click here to view


