Make your mark on the crafty world wearing this stunning bracelet, earrings and necklace set
What you need...
- Polymer clay, lilac, lavender, candy pink, dusky pink, deep pink, gold
Dies, Frame and Pendant (657015), Oval Frame, Bird and Pendant (657019), Sizzix
Embossing Folder, Damask and Regal Flourishes (656648), Sizzix
Punch, paper, flower, small
Cutters, clay: circle, 2cm; heart, small; teardrop, small
Varnish, gloss, clear
Findings, silver, ear wires, jump rings, chain, clasps, head pins
Beads, bicones, crystal
Tile, plain
instructions
-
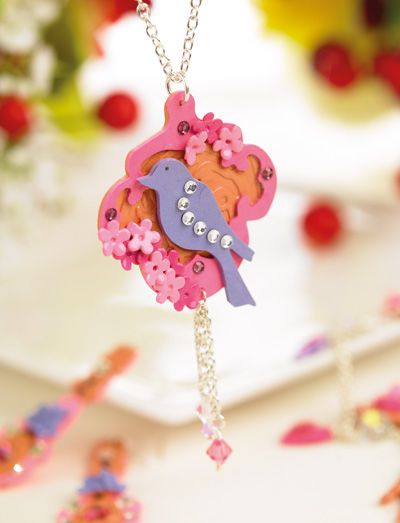
pendant - 1 Roll out a ball of dusky pink clay about the size of a ten pence coin to 1mm thick. Place onto a baking tile and flatten to remove any air bubbles from underneath. Do the same with a smaller ball of lavender clay before part-baking the two sheets at 130ºC for five minutes. Allow the semi-rigid sheets to cool.
2 Place the pink sheet over the ornate frame design on the Sizzix die and position between a pair of cutting plates. Run through the machine slowly, as you would for thick card and remove the shape from the die. If you find areas of the clay appear to be stuck inside the die, ease them out carefully with a craft knife or knitting needle.
3 Cut a motif from the lavender sheet using the bird die in the same way. Mix equal amounts of gold and candy pink together to create a muted colour. Prepare to a thickness of 1mm and place the sheet inside the Regal Flourishes embossing folder. Roll gently over the folder to impress the surface of the clay and carefully remove the sheet.
4 Lay the embossed clay onto a baking tile and place the semi-rigid frame on top. Use a scalpel to cut precisely around it. Keep the frame on the tile to decorate and avoid disturbing the outline. Fix a small ball of waste raw clay to the back of the semi-rigid bird shape and use this to fix the bird to the middle of the frame. Roll out sheets of deep and candy pink clay to a thickness of around 0.5mm. As a guide, you should be able to handle the sheet without it stretching out of shape.
5 At this point you may find it helps to put the sheets in the fridge for a few minutes, especially in hot weather, as this will harden them sufficiently. Slide one into the mouth of a small flower paper punch. If it is too thick, roll it thinner. Hold the punch in your hand and depress the lever to cut easily through the clay. Keep the lever depressed so that the clay shape is sitting on top of the die. Use the tip of a scalpel to remove it without damaging the outline, and before releasing the punch.
6 Cut several from candy and deep pink clay in this way. Arrange the flowers around areas of the semi-rigid frame and secure by pressing the centre of each down with a knitting needle. Bake the finished frame on the tile for a further 30 minutes at 130ºC to fully cure. A lower temperature or shorter time may result in parts of the pendant breaking off. Allow the baked design to cool and use a thick PVA-based glue to fix flat-backed gemstones to the frame and on the bird's body indicating a wing. Paint the whole pendant with a generous coat of clear gloss varnish and leave to dry.
7 Form a small hole at the top and bottom of the pendant by rotating the point of a scalpel against the clay. Alternatively, use a small hole punch tool but take care not to crack the baked clay. Attach several short lengths of silver chain to the bottom hole with a jump ring. Thread a few crystals onto short head pins, bend the end of each into a loop and fix to the loose ends of chain. Place a larger jump ring in the top hole and thread a length of chain through this, adding a clasp and jump ring to secure. -
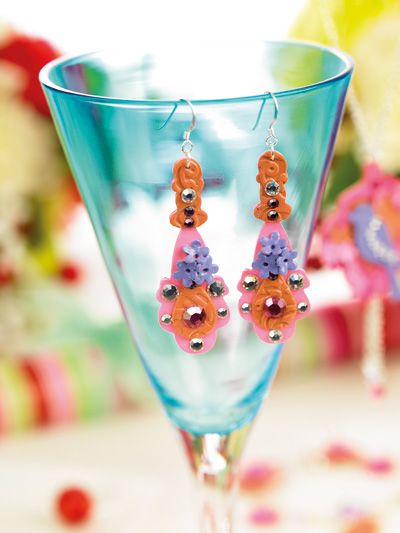
earrings - 1 Roll out a small sheet of candy pink clay to a thickness of 1mm and place onto a baking tile. Smooth out to remove any air bubbles and part bake for five minutes at 130C. Allow the sheet to cool and use a die-cutting machine to create two pendant shapes from die 657015.
2 Mix equal amounts of gold clay and candy pink together to create a muted colour. Roll out to a thickness of 1mm and place the sheet inside the Regal Flourishes embossing folder. Roll gently over the folder to impress the surface of the clay and carefully remove the decorated sheet. Use a small teardrop cutter to produce two shapes from the embossed sheet and place these in the centre of each pendant.
3 Re-roll the remaining clay and place it on the tile. Press the top of one pendant shape face down onto the clay and cut around the outline with a scalpel. Use a thin blade to lift the medium and pendant from the tile and turn over. Trim the bottom edge of the raw clay, then press half the embossing folder against it to create a relief pattern. Repeat for the second pendant.
4 Roll out a small sheet of lavender clay to a thickness of around 0.5mm and chill in the fridge for a few minutes. Slide the chilled sheet into the mouth of a small flower paper punch. Depress the lever and keep it held down while removing the clay shape with the tip of a scalpel. Cut out several flowers from lavender clay in this way and arrange them in the centre of the pendants so they match. Hold them in place by pressing the centres of each flower against the semi-rigid clay with a knitting needle.
5 Press gemstones into the raw clay areas, if desired, before baking the pair of earring pendants for 30 minutes at 130C. Allow to cool and add more flat-backed gems using PVA glue and varnish. Drill holes in the tops of each earring and fir silver jump rings into the holes. Attach a pair of silver ear wires, ensuring they are facing forward when worn. -
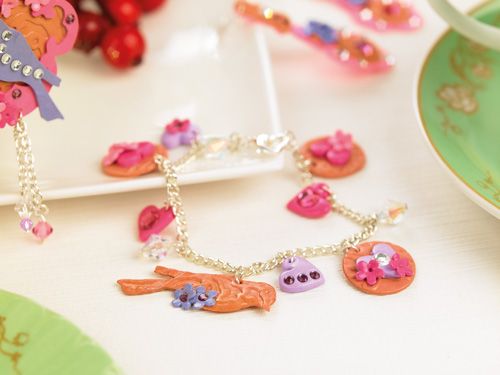
bracelet - 1 Mix candy pink with gold to make a muted colour and roll it out to a thickness of 1mm. Place between two pieces of plain paper. Run the sandwich through a die-cutting machine in the normal way to cut the bird motif. Use a pair of tweezers or the point of a scalpel to remove the paper from either side of the clay bird.
2 Place the shape inside the embossing folder and gently press down over the top to impress the surface. Put the bird onto a baking tile and use a needle tool to make a hanging hole on its shoulder. Punch out two small lavender flower shapes from a thin sheet as described before, and add to the base of the bird shape. Press two small flat-backed gemstones in the centre of each flower. Re-roll the left-over muted gold clay and emboss as before.
3 Lay onto the baking tile and use a small circle clay cutter to produce a few embossed discs. Roll out deep pink or lilac clay to a thickness of 2mm and make heart shapes. Lay a heart onto each gold disc and decorate with flat-backed gems or punch flower shapes. Use a needle tool to make a hanging hole at the top of each circle charm. Cut thicker hearts and decorate with a selection of flowers and gems.
4 Pierce a hole in one side of each heart, then bake all the charms for 30 minutes at 130ºC. Allow the charms to cool before varnishing with a clear gloss. Whilst drying, thread a few silver head pins with large clear bicone crystals. Trim the pin ends to about 7mm and bend onto a loop with round-nosed pliers. Take a bracelet length of chain and fix a clasp and jump ring on the ends. Fit jump rings along the length of the chain approximately 2cm apart. Add jump rings into each clay charm and attach to the bracelet, interspersing them with crystals.
Sizzix Big Shot, dies and embossing folders, Sizzix, 0844 499 8181, http://www.sizzix.co.uk
Flat-backed gems, JosyRose, 0845 450 1212, http://www.josyrose.com
Polymer clay from all good craft shops


