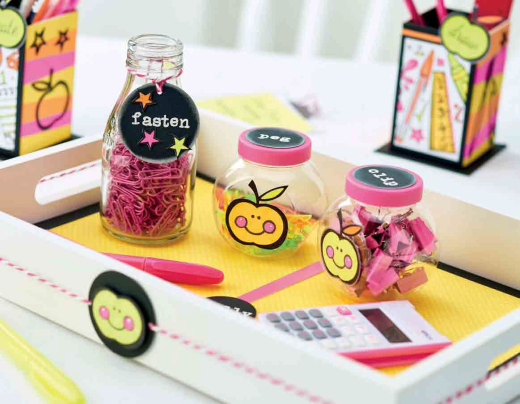
Score top marks with this savvy stationery station and card from Helen Fitzjohn
What you need...
- Cardstock, My Colors, Limelight
Papers: BoBunny 12” Double Dot, yellow, green; neon pink
Card, white b Stamps, alphabet
Ink-pad, Tsukineko; Versacolor, silver
Pens: Paper Poetry, neon gel; ProMarker, assorted colours
Embossing powder, white
Punches, Woodware, circle 3.8cm, 5cm
Black mountboard
Wooden tray, 32cm
instructions
-
Neon Station - 1 Cut mountboard 30cm x 33cm, and add double-sided tape to the reverse to stick inside the back edge of a wooden tray when finished. Cover with cardstock, leaving a border. Surround a 30cm metal ruler with tape, then attach to black card, 4.3cm x 33cm.
2 Print the templates onto white card. Colour with ProMarkers, then use neon pens on top. Stick 1.3cm strips of neon paper across the memo board. Stamp and emboss ‘memo’ onto black card, then punch out as circles. Add these and the stationery panel to the board.
3 Create a magnetic area by sticking the ruler to the board using double-sided tape. Cut out pen and pencil shapes, then fix magnetic tape to the back. Photocopy a notebook from the templates. Cover the base of the tray in black card and yellow spot paper. Add neon pink strips and a stamped circle with a name.
4 Turn black mountboard over so the white side is facing up. Measure, score and cut the template to make the basic pot. Tape the sides together, then glue different widths of neon paper across. Stick 5cm widths of the stationery panel on top of black card, 6cm x 10cm.
5 Add 3mm strips along the top, then attach to the front, adding black card to the back. Colour apples and edge using an ink-pad before sticking to the front. Attach pen pot tabs to 8cm square bases.
6 Trace around an apple, pen and pencil shape onto black card. Cut out the inside of each, leaving a thick black line. Stick to the sides of pots over the neon strips. Emboss ‘peg’, ‘clip’ and ‘fasten’, then punch out as circles. Edge with a silver ink-pad, add to pot lids then fill with pegs and paperclips. Stick the memo board to the back edge of the tray, then fill with stationery and Post-it note hanger -
Good Luck Card - 1 Score A4 card in half horizontally and fold. Trim to make a blank, 14.5cm x 21cm. Stick two 5mm strips of green spot and 5.5cm length of Limelight to the front. Add angled strips of neon paper at slight angles.
2 Cut two rectangles from black card, 5.5cm x 6.5cm. Trim the top and right edges at an angle and punch a 3.8cm hole in one. Cut another rectangle, 7.5cm x 8.5cm, edge as before, then punch a 5cm hole.
3 Stamp ‘Good Luck’ onto a strip of black card using alphabet stamps in silver. Cover with white embossing powder and heat set. Print the templates onto white card. Colour with ProMarkers and neon gel pens as before. Cut out the pencil and pen shapes and stick to card using foam pads.
4 Wrap twine around the card, adding a ‘Good Luck’ sentiment with tape at the back. Punch a 5cm circle from black card and stick to the front with foam pads. Add an apple. Punch extra circles from black and use to cover the taped twine on the inside.


