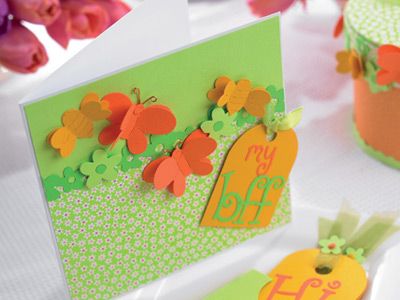
Celebrate the arrival of summer with this gorgeous nature-inspired set of cheerful greetings
What you need...
- Box, circular, papier mâché
Ribbon, sheer, wired, green
Flowers, e.Floral
Embellishments
Card, Bazzill, lime green, green, yellow, orange
Paper, 12” x 12”, Basics orange flower/dot (55032)
Wire, gold
Glue, PVA
Foam pads, 3-D
Punch, jumbo circle
Stickers, Baby Girl/Baby's breath, Doodlebug
Sizzix Big Shot, assorted dies
instructions
-
My Bff - 1. Cut white card, 15cm square. Cover the bottom two thirds with floral paper and the top area with lime green card. Die-cut a selection of flowers from the same colour and affix them across the join.
2. Die-cut four orange butterflies and four yellow bees. Divide the butterflies into two pairs, then assemble the bodies together so the wings remain free. Fold them upwards for dimension, then repeat for the bees.
3. Decoupage two flowers in the row of blooms across the join to add dimension. Die-cut a tag and write 'my bff' across it. Decorate with a short length of ribbon, then secure to the corner of the card with foam pads.
4. Take a short length of gold wire and curl the ends up slightly using pliers. Fold the strand in half to form butterfly antenna. Secure behind the butterflies, then arrange the motifs across the card at angles, as shown.
-
Thanks - 1. Take a white blank, 10cm x 12cm, and cover with floral paper. Die-cut two orange butterflies and join the bodies together, leaving the wings free as before.
2. Create antennae from gold wire, curled up at the ends and folded in half. Cut yellow card, 4cm x 6cm, then mount it onto green. Adhere centrally to the front of the blank with 3-D foam pads.
3. Secure the butterfly to the middle of the panel and add the antennae, as shown. Die-cut letters to spell 'thanks' from green card, then layer horizontally onto a strip of lime.
4. Affix the wording panel to the greeting so that it sits below the butterfly. Finish by die-cutting two flowers and arranging them on either side of the message with 3-D foam pads.
-
Hi Tag - 1. Create a pouch tag, 8cm x 13cm, using the picture as a guide. Cut a semi-disc from the top, at the opening, using a jumbo circle punch. Die-cut two green flower strips, then apply across the front.
2. Die-cut four butterflies, adhere the bodies together leaving the wings free and secure to the front of the tag, adding curled wire antennae. Decorate further with a row of die-cut green flowers.
3. Add a few further flowers, securing them with foam pads for extra interest. Make a small yellow blank, 7cm x 13cm. Die-cut letters to spell 'Hi' and affix to the front.
4. Cut two lengths of ribbon and secure them to the tag with a brad. Finish by adding a small flower to each.
-
Gift Box - 1. Cover the base of a papier mâché box with orange floral paper. Add a strip of green card to tidy up the base using doublesided tape. Cover the surface and side of the lid with a matching floral sheet.
2. To decorate the box, die-cut and assemble four butterflies. Arrange them around the sides, equally spaced, then repeat with four bees, positioning them so they fill in the spaces between the motifs, as shown.
3. Die-cut a selection of flowers from green and lime paper. Affix them randomly around the lid, layering some together for extra dimension. Snip two further blooms from green and orange, affix together and make a hole in the centre.
4. To finish, thread a length of green sheer ribbon through the hole to form a loop and attach to the top of the box with a large foam pad.
Sizzix Big Shot and assorted dies, Sizzix. For more information, see [url=http://www.sizzix.co.uk]http://www.sizzix.co.uk[/url]


